Showing posts with label SharePoint Programming. Show all posts

Check if the people picker has a user or a group in sharepoint Programatically

A quick tip to check if the account in the people picker field for an item is a User or a SharePoint group using code.

Code -
SPweb web = SPContext.Current.Web;

SPFieldUserValue _pickerValue = new SPFieldUserValue(web, item["PeoplePickerName"].ToString());

bool isUser = SPUtility.IsLoginValid(site, pickerValue.User.LoginName);

if (isUser)
{
// Its a SharePoint User
}
else
{

// Its a SharePoint Group

}

Creating\Updating list items in subsite via Sharepoint webservices

If you ever want to add or update a list item in your subsite using SharePoint's Lists.asmx webservice you would notice that that even after registering the subsite's lists.asmx url you would end up updating the item on the parent site instead.

To solve this issue simply set the webservice url in your code to point to the subsite url(see below)

ListService.Credentials = System.Net.CredentialCache.DefaultCredentials;

ListService.Url = "https://SPParentSite/subsite/_vti_bin/Lists.asmx";

simple isn't it.

Creating SharePoint list item with vbscript and WebServices

Few days back I had some urgent requirement to create and update a sharepoint list item using vbscript and sharepoint WebServices. After goggling a bit i found a solution in one of the msdn forums .. so posting the code here with my additions

Code :
Sub AddListItem(site, listGUID, itemTitle)
strEndPointURL = "http://moss" + site + "/_vti_bin/Lists.asmx"
strSoapAction="http://schemas.microsoft.com/sharepoint/soap/UpdateListItems"
Set objSOAPConnector = CreateObject("MSOSOAP.HttpConnector30")
with objSOAPConnector
.Property("EndPointURL") = strEndPointURL
.Property("SoapAction") = strSoapAction
.Connect
End With
Set objSOAPSerializer = CreateObject("MSOSoap.SoapSerializer30")
with objSOAPSerializer
.Init(objSOAPConnector.InputStream)
.startEnvelope()
.startBody()
.StartElement "UpdateListItems", "http://schemas.microsoft.com/sharepoint/soap/"
.StartElement "listName", "http://schemas.microsoft.com/sharepoint/soap/"
.WriteString(listGUID)
.EndElement()
.StartElement "updates","http://schemas.microsoft.com/sharepoint/soap/"
.StartElement "Batch"
.SoapAttribute "ListName", ,listGUID
.SoapAttribute "OnError", ,"Continue"
.StartElement "Method"
.SoapAttribute "ID", ,"1"
.SoapAttribute "Cmd", ,"New"
.StartElement "Field"
.SoapAttribute "Name", ,"Title"
.WriteString(itemTitle)
.EndElement()
.EndElement()
.EndElement()
.EndElement()
.EndElement()
.endBody()
.endEnvelope()
End With
objSOAPConnector.EndMessage()
Set objResponseReader = CreateObject("MSOSOAP.SoapReader30")
objResponseReader.Load(objSOAPConnector.OutputStream)
Wscript.echo objResponseReader.Body.xml
End Sub

SharePoint Programming

programmatically Open and save documents in document library SharePoint

The example below has two functions, one for opening and one for saving a specific document in a document library. This code requires the Open XMl SDK, so you will need to download and install it and reference its assembly. In addition, you need to add a reference to the WindowsBase assembly and the Microsoft.SharePoint assembly.

Steps Involved are :

1.Reference the following assemblies in your project

using System.Text;
using System.Threading;
using Microsoft.SharePoint;
using DocumentFormat.OpenXml.Packaging;
using DocumentFormat.OpenXml.Wordprocessing;

2. Call the OpenDocument function in your code.

Code :

protected void OpenDocument(string siteUrl)
{

using (SPSite spSite = new SPSite(siteUrl))
{

//Get the document from the library using SPQuery
SPList list = spSite.RootWeb.Lists["Shared Documents"];
SPQuery query = new SPQuery();
query.ViewFields ="<FieldRef Name='FileLeafRef' />";
query.Query ="<Where><Eq><FieldRef Name='FileLeafRef' /><Value Type='Text'>MyDoc.docx</Value></Eq></Where>";

SPListItemCollection collection = list.GetItems(query);

//Get the first document returned. There should be one only.
SPFile file = collection[0].File;
byte[] byteArray = file.OpenBinary();

using (MemoryStream memStr = new MemoryStream())
{
memStr.Write(byteArray, 0, byteArray.Length);

using (WordprocessingDocument wordDoc = WordprocessingDocument.Open(memStr, true))
{

//Getting the document object
Document document = wordDoc.MainDocumentPart.Document;

// Read first paragraph

Paragraph firstParagraph = document.Body.Elements<Paragraph>().FirstOrDefault();

// Now lets append our own paragraph, if document already has text
if (firstParagraph != null)
{
Paragraph testParagraph = new Paragraph(

new Run(new Text("We are Adding this text for Testing!")));
firstParagraph.Parent.InsertBefore(testParagraph,
firstParagraph);
}

//After your done. Lets just save it back. Call the SaveDoc method
SavingDoc(file,memStr);
}

3. Code for Saving the document back in SharePoint.

Protected void SavingDoc(SPFile file, MemoryStream memStr)
{
string linkFileName = string.empty;
linkFileName = file.Item["LinkFilename"].ToString();
file.ParentFolder.Files.Add(linkFileName, memStr, true);
}

To create and add a new document see my post Programmatically Create and upload document in Sharepoint 2010 document library
Display All Users in SharePoint Site Webpart

This webpart will display all the users from each group in the current site. You can however add a foreach loop for each web (or site) in the site collection to get all the users in a site collection.

The OutPut will look something like :


See detail Post : All Users in SharePoint Site Custom Webpart

Deploy Custom Css file in SharePoint with Solution Package

For deploying CSS file in SharePoint 2010's _layouts folder(14 hive) see
Add custom css file to styles folder in _layouts Sharepoint 2010

For deploying CSS file in SharePoint 2010's STYLE Library see
Deploy custom Css,Js files in SharePoint 2010 using visual studio 2010


In this Post we will use VSewss extensions to deploy our Custom css file in SharePoint 2007's _layouts folder(12 Hive) as Feature and solution package.

Note : You can use this method to deploy various other files like custom aspx page, Custom Layout page, master page, Images, javascript files etc in 12 hive.

Before you start make sure that you have latest version of VseWSS extentions installed for your appropriate Visual Studio Version .

Steps are :

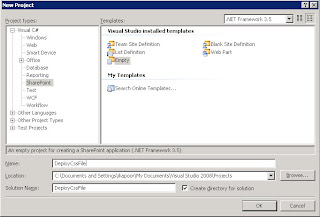
1. Open the Vs and Create a SharePoint Type empty project


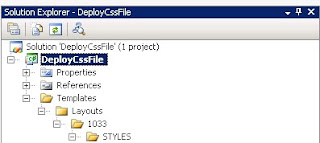
2. Next we will add a SharePoint object called "Templates". Once you hit add you will notice that a folder named "Templates" is created in our project along with a text file called TempleFile.txt. We will however, delete the "TemplateFile.txt" file since we dont need it, and will create a 12 hive folder structure under the added "Templates" folder to deploy for custom file. See the screens below.

Adding Templates object:


Create Folder structure Layouts->1033->STYLES under Templates folder :


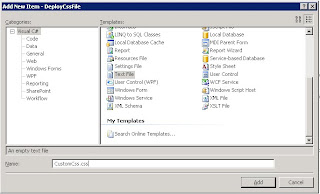
3. Now add your Custom Css file under STYLES folder. You can also create new one as i did in the below screen :


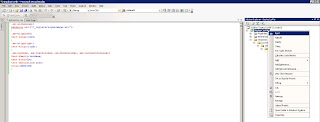
4. It added some Css classes ( just for testing) and Built the webpart.


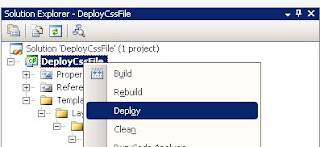
5. After a succesful build. Lets hit Deploy. Once you hit deploy the Vsewss will create all the necessary solution and feature files for your deployment ( See the status bar - Says Creating Solution). At this time you would probbaly get an error like "No SharePoint Site exist at this url" this is because we have not specified the url of any SharePoint site for the deployment. You can however, get the .wsp file or soltuion file from your project folder on your local machine and deploy it using stsadm.


6. Verify the deployment.

Programmatically Show\Hide or Change links in quick launch bar

You can programmatically Show\Hide or Change Url for the links in Quick Launch bar according to the logged in User or Whatever your condition is. In this post however, we will just Change the Url for one of links in quick launch bar, according to the logged in user's group. The Code is written in a User Control which will later be added to the master page. Adding the Control in the master page does add some overhead but will allow the code to run on each sharepoint page.

Initial requirement -

Change the Url for one of the links called "Your Department" in quick launch bar according to the logged in user's group.

Steps :

1. Create Webapplication project and add a Web UserControl in it.

2. Add References to Microsoft.SharePoint dll.

Use the below method in Page load to Change the url:

private void ChangeLink(string NewLink)
{

SPSite site = SPContext.Current.Site;
SPWeb myWeb = site.RootWeb;

SPSecurity.RunWithElevatedPrivileges(delegate()
{
using (SPSite siteCollection = new SPSite(site.ID))
{
using (SPWeb web = siteCollection.OpenWeb(myWeb.ID))
{
web.AllowUnsafeUpdates = true;

SPNavigationNodeCollection nodes = web.Navigation.QuickLaunch;

foreach (SPNavigationNode node in nodes)
{
CheckURL(node,web, NewURl);
}

web.AllowUnsafeUpdates = false;
} }
});

}

private void CheckURL(SPNavigationNode Node,SPWeb web,string NewURl)
{

if (Node.Children.Count > 0)
{
SPNavigationNodeCollection childNodes = Node.Children;
foreach (SPNavigationNode cNode in childNodes)
{
if (cNode.Title.ToString() == "Your Department")
{
cNode.Url = NewURl;
cNode.Update();
}
}
}
}

In above Code CheckURL method will navigate through each link in the quick launch bar to find the one with name "Your Department". If the link is found we can simply use cNode.Url and cNode.Update() to update the url.

3. After, you are done writing the logic, just Sign the Project and Build it. Dont forget to drop the signed dll in GAC.

4.. Finally, add the user Control in the Master Page and Test it.

Using SPGridView to Display list Data WebPart

In this example, SharePoint's SPGridView control is used to display List Data in a Custom webpart. The webpart is created using VseWss and it uses a Custom list called "Clients". A Custom Column named "ClientsName" is displayed in the Spgridview as output.

OutPut :


Code :

using System;
using System.Web.UI;
using System.Web.UI.WebControls;
using System.Web.UI.WebControls.WebParts;
using Microsoft.SharePoint;
using Microsoft.SharePoint.WebControls;
using Microsoft.SharePoint.WebPartPages;

namespace MyCustomWebPart
{
[Guid("f66be37b-91f9-4e99-97dc-0e30f6eb44ff")]
public class MyCustomWebPart : System.Web.UI.WebControls.WebParts.WebPart
{
SPGridView myGrid;

public MyCustomWebPart()
{
}

protected override void CreateChildControls()
{
base.CreateChildControls();
SPDataSource SPDataSource1 = new SPDataSource();
try
{
SPSite mySite = SPContext.Current.Site;
SPWeb myWeb = mySite.OpenWeb();

//Using RunWithElevatedPrivileges

SPSecurity.RunWithElevatedPrivileges(delegate()
{
using (SPSite siteCollection = new SPSite(mySite.ID))
{
using (SPWeb web = siteCollection.OpenWeb(myWeb.ID))
{
myGrid = new SPGridView();
myGrid.AutoGenerateColumns = false;

BoundField ClientName = new BoundField();
ClientName.HeaderText = "Our Clients";
ClientName.DataField = "ClientsName";
myGrid.Columns.Add(ClientName);

SPList List = myWeb.Lists["Clients"];
SPDataSource1.List = List;

myGrid.DataSource = SPDataSource1;
myGrid.DataBind();

Controls.Add(myGrid);}}
});
}
catch { }}
}
}

Disclaimer

This is a personal weblog. The opinions expressed here represent my own and not those of my employer or anyone else. Should you have any questions or concerns please e-mail me at sharepointprogrammingblogger@gmail.com .

Copyright (c) 2010 @ myshaepointwork.blogspot.com. All rights are reserved.Do Not Copy.

@ Learning SharePoint.com